
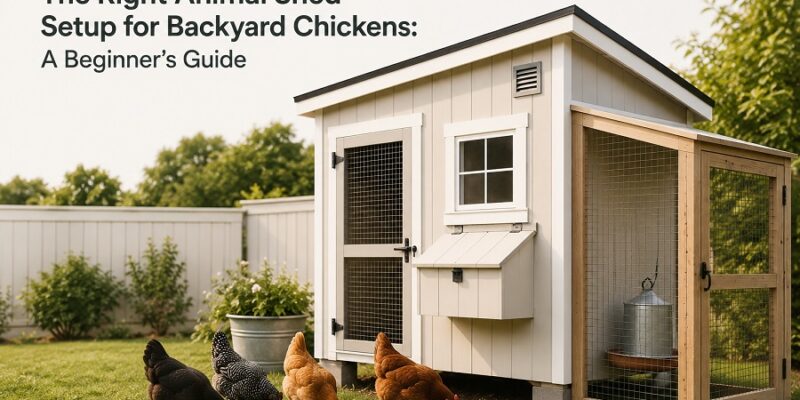
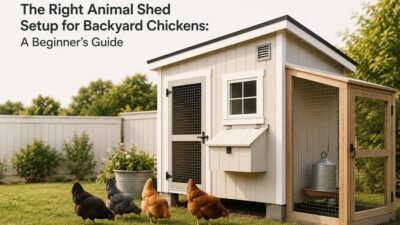
So you’ve decided to keep backyard chickens. Maybe you want fresh eggs every morning, or maybe you’re drawn to the idea of a more self-sufficient lifestyle. Either way, one of the first things you’ll need to figure out is where your birds are going to live. Getting the housing right from the start makes everything else easier, and that begins with understanding what a proper chicken shelter actually needs. Most first-timers start by looking into animal sheds as a foundation, and for good reason. They’re practical, cost-effective, and far more versatile than a purpose-built chicken coop in many situations.
This guide walks you through everything a beginner should know before setting up a chicken shed, from size requirements and ventilation to predator-proofing and flooring choices.
Why the Right Shelter Matters More Than You Think
Chickens are surprisingly resilient animals, but poor housing will wear them down quickly. A badly designed shelter leads to respiratory illness from poor airflow, frostbite in winter, heat stress in summer, and constant predator pressure that keeps your flock anxious and unhealthy.
Getting the basics right isn’t about spending a lot of money. It’s about understanding what chickens actually need and making sure those needs are consistently met through the structure itself.
Step 1: Figuring Out the Right Size
The general rule of thumb most chicken keepers follow is 4 square feet of indoor space per standard-sized chicken. If your birds will spend a lot of time confined due to weather or local ordinances, bump that up to 5 or 6 square feet per bird. Crowded chickens peck at each other, stress out, and get sick more often.
For a small backyard flock of 4 to 6 birds, a 10×10 or 10×12 shed gives you plenty of room for the birds themselves plus storage for feed, bedding, and supplies. If you plan to expand your flock later, size up now. Adding onto a shed is much more complicated than starting with a little extra space.
Don’t forget to account for the run, which is the outdoor fenced area attached to the shed. Chickens need room to scratch and move. A good target is 8 to 10 square feet of run space per bird, though more is always better.
Step 2: Ventilation Is Non-Negotiable
This is where a lot of beginners go wrong. They assume that keeping chickens warm means keeping a shed tightly sealed, but that logic backfires quickly.
Chickens produce a significant amount of moisture and ammonia through their droppings and breathing. Without proper airflow, that moisture builds up in the bedding and air, leading to respiratory problems and mold growth. A well-ventilated shed should have vents or openings near the roofline that allow moist air to escape without creating a direct draft at bird level.
A good setup includes vents at the top of at least two opposing walls. You want cross-ventilation, not a wind tunnel. The goal is steady air exchange without your birds sitting in a cold breeze at night.
In summer, ventilation is about cooling. In winter, it’s about moisture control. Both seasons demand airflow, just managed differently.
Step 3: Predator-Proofing Your Setup
If you have chickens, every predator in your area will eventually take notice. Raccoons, foxes, coyotes, opossums, hawks, and even neighborhood dogs are all potential threats. The shed itself is your first line of defense.
Here’s what to pay attention to:
Doors and latches: Raccoons are shockingly clever and can open simple latches. Use two-step latches or carabiner clips on all entry points. A door that blows open in the wind is an invitation to disaster.
Flooring: A dirt floor is risky because predators can dig under the walls overnight. Options include a solid wood floor elevated off the ground, a concrete pad, or hardware cloth buried around the perimeter at a depth of at least 12 inches and bent outward in an L-shape to deter diggers.
Windows and vents: Cover all openings with hardware cloth, not chicken wire. Chicken wire keeps chickens in but doesn’t keep determined predators out. Hardware cloth with a half-inch mesh is the standard.
The run: Bury hardware cloth along the perimeter or lay it flat on the ground extending outward from the fence line. Cover the top of the run if hawks are active in your area.
Step 4: Interior Setup and Roosts
Chickens don’t sleep on the floor by choice. In the wild, they roost in trees to stay safe from ground predators. In your shed, they need roosting bars to feel comfortable and secure.
Use 2×4 lumber laid flat (wide side up) for roosts. This lets chickens wrap their feet around the bar without their toes dangling, which matters especially in cold climates where exposed toes can get frostbitten.
Position roosts at least 18 inches from the wall and 2 feet off the ground. If you’re stacking roost bars at different heights, space them at least 12 inches apart vertically so birds on lower bars don’t get droppings from above. All roosts should be higher than the nesting boxes to encourage birds to sleep there rather than in the nest.
Step 5: Nesting Boxes
Nesting boxes are where your hens lay their eggs. You don’t need one per bird. A ratio of one box for every 3 to 4 hens works well in practice, since hens tend to prefer the same boxes and queue up to use them.
Each box should be about 12 inches wide, 12 inches tall, and 12 inches deep. Line them with clean bedding like straw or wood shavings. Boxes mounted slightly off the ground work well, and adding a small lip at the front helps contain nesting material.
Keep nesting boxes in a darker, quieter corner of the shed. Hens like privacy when laying and are more likely to use boxes that feel enclosed and calm.
Step 6: Flooring and Bedding
The floor of your chicken shed takes a beating. Droppings accumulate fast, moisture is a constant challenge, and you want something your birds can scratch and move around on without injuring themselves.
The deep litter method is popular for good reason. You start with 4 to 6 inches of carbon-rich bedding like pine shavings, straw, or dried leaves, and you add more on top as it compacts down. The layering process creates a mild composting effect that actually reduces odor and generates a small amount of heat in colder months. Full cleanouts happen two to four times a year.
For the base of the shed, a plywood floor elevated on skids works well. It keeps moisture from wicking up from the ground and makes the structure easier to move if needed. Seal the wood before installing to extend its life under constant exposure to moisture and droppings.
Step 7: Light and Egg Production
Hens need roughly 14 to 16 hours of light per day to maintain consistent egg production. In summer, natural daylight handles this on its own. In winter, egg laying often drops off as days shorten.
Many backyard keepers add a simple LED bulb on a timer to supplement light during short days. This isn’t required, and some people prefer to let their hens rest naturally over winter, but if consistent egg production matters to you, a small lighting setup inside the shed makes a real difference.
Step 8: Water and Feed Setup
Keeping water inside the shed is convenient but can create moisture problems if it spills frequently. A nipple-style waterer reduces spillage significantly and keeps things cleaner. In freezing climates, a heated waterer or a heated base under a standard waterer prevents ice from forming overnight.
Mount feeders and waterers at back height for your birds to reduce the amount of feed scratched out onto the floor. It cuts down on waste and keeps the bedding drier.
Final Thoughts
Setting up a chicken shed doesn’t have to be complicated or expensive. The fundamentals, enough space, solid ventilation, predator-proofing, proper roosts and nesting boxes, and good bedding management, are the things that actually determine whether your flock thrives.
Take time to observe your birds after you get them settled. Chickens tell you a lot about whether their environment is working. A healthy, calm flock that lays consistently is a good sign that you’ve gotten the basics right. A stressed, pecking, low-producing flock is usually a signal that something in the setup needs adjusting.
Start simple, get those fundamentals dialed in, and build from there. Your chickens will reward you for it.


Comments